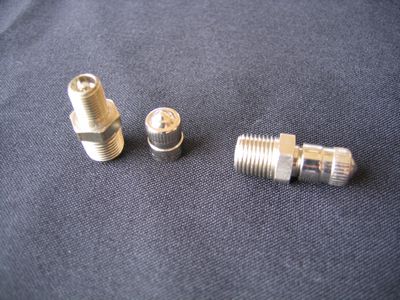
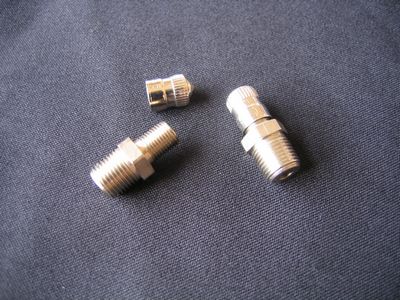
THESE AIR VALVES DO NOT FIT THE 1981-85 "PIGGY-BACK" RESERVOIR STYLE OHLINS TWIN SHOCKS
THESE ARE THE CORRECT VALVES AND CAPS FROM THE ORIGINAL SUPPLIER TO OHLINS.
REPLACE YOUR OLD, CORRODED AND DULL LEAKING FILLER VALVES WITH THESE SHINEY NEW VALVES AND MAKE YOUR SHOCK RESTORATION COMPLETE.
SOLD IN PAIRS (2)
WARNING PLEASE READ FIRST
REMOTE RESERVOIR STYLE Ohlins 1/8-28 Britishtapered/fine thread Schrader gas fill valve replacement instructions
The Schrader gas fill valves in the remote reservoir alloy end caps and in the early piggyback end caps use a 1/8-28 British tapered fine thread and are a very tight fit and were not designed to be easily removed, however after 30 years many valves may be leaking and show signs of physical damage and peeled off plating and generally look pretty weathered which will require replacement. Do not attempt to unscrew and replace the valves until you have read these instructions and if you are then not confident on removing them, then have a qualified mechanic or suspension technician do the job for you.
De-pressurize and remove the reservoir from the hose on remote reservoir shocks, but leave the reservoir attached to the piggyback shock unless you have the right tools to remove the reservoir and clamp it with out damaging the body. If you have some soft alloy clamps you can remove the reservoir end cap and clamp it in the soft alloy clamps in a vise. You have to be able to hold the cap firmly so it will not rotate when you unscrew the valve or damage it when clamped. If you don’t have clamps to hold the reservoir cap, leave it in the reservoir body. In most cases the tight fit of the o-ring will hold the cap and it will not rotate.
The valves are a very tight fit and will require a lot of heat to loosen using a propane or oxy/acetylene torch with a small flame. A heat gun may also be used if it puts out enough heat to get the cap hot enough that it will sizzle if you put a drop of water on it. Heat the cap around where the valve is and concentrate the heat in this area. Be very carefull heating the alloy as alloy does not go red when heated. Too much heat will instantly melt the alloy and you won’t have any pre warning that its going to melt. So don’t hold the flame in one place for too long. If you are not experienced with heating alloy, stop here and take it to someone who is to do the job.
Once the cap is getting hot, fit a wrench on the valve and see if it will unscrew. If it is still not loose, some more heat will be required.
Once you have got the cap hot enough the valve will start to turn with a wrench.
Do not continue to unscrew valve all the way out as you can still tear the fine thread in the alloy.
Unscrew the valve very small amounts at a time. Do not rush and force it to unscrew.
You can also spray a light penetrating oil around the thread of the valve and it will work its way into the thread. Keep reapplying some more heat, but be aware the oil will burn a little so be carefull. Keep on unscrewing the valve, working it back and forth and slowly unscrewing it and reapplying more heat. Once you have got it unscrewed several turns it should feel loose enough to freely unscrew all the way out and no resistance should be felt.
If you have taken your time and used care, you will have unscrewed the valve with out damaging the thread in the alloy. Remove the cap from the reservoir if you have used the reservoir to hold the cap, and wash it in solvent and polish/clean up ready for re-assembly. Use thread tape or thread sealant on the new valve and screw it into the cap. Do not over tighten. After re-assembly check for leaks around the thread.
If you do damage the thread in the alloy cap when removing the valve, and it does not clean up satisfactorily with a thread tap, you can fit a 1/8 NPT helicoil thread repair insert or drill out and tap to suit a different valve with a larger thread.